
How to build an automatic villager wheat farm in Minecraft
Learn how to build a fully automatic wheat farm in Minecraft using villagers. Step-by-step guide on creating an efficient farm.
How to build an automatic villager wheat farm in Minecraft
An automatic villager wheat farm collects crops without the player's participation: two farmer villagers plant and harvest the mature stems themselves, and the ready bread flows through Hoppers into a Chest. Instead of manual farming in Minecraft, you build the structure once, populate it with three villagers — and then the farm works by itself as long as the chunk is loaded. Everything fits into two compact 9×9 areas next to each other. This guide walks you through every step: from the materials list to the launch, when bread starts accumulating in the Chest.
Preparation
Before building, gather all the materials. The calculation is given for a full farm of two fields.
Material | Quantity |
Wheat Seeds | 160 |
Building blocks | 143 |
Hopper | 4 |
Minecart with Hopper | 4 |
Composter | 2 |
Water Bucket | 2 |
Glowstone | 2 |
Chest | 2 |
Trapdoor | 2 |
Slab | 2 |
Rail | 1 |
Fletching Table | 1 |
In addition to the blocks, you will need a hoe (at least stone), a boat to transport the villagers, and access to three unemployed villagers. The site should be a flat surface with space for two 9×9 fields and a gap between them.
Version: the farmer mechanics work in Minecraft Java Edition from 1.14 and newer.
How it works
An unemployed villager who finds themselves near an available Composter becomes a farmer. The farmer independently harvests mature wheat within the plot and immediately plants the empty farmland with Wheat Seeds from their inventory. A villager's inventory only has 8 slots, so over time it fills up with seeds and wheat.
When a farmer has at least 6 wheat in one slot, and there is a hungry villager nearby, the farmer turns the excess into bread and throws it to that villager. This is exactly why a third villager is needed — a fletcher in the center. They never farm, so they always remain "hungry", and both farmers repeatedly throw bread in their direction. Two Minecarts with Hoppers stand on the throwing line and intercept the bread, directing it through the Hoppers into a Chest.
Step 1. Field outlines
On a flat surface, lay out two square 9×9 outlines so that there is a 1-block gap between them. These are the outer walls of the future fields. Then raise both outlines to a height of 2 blocks — such a wall will prevent villagers from jumping out of the area.
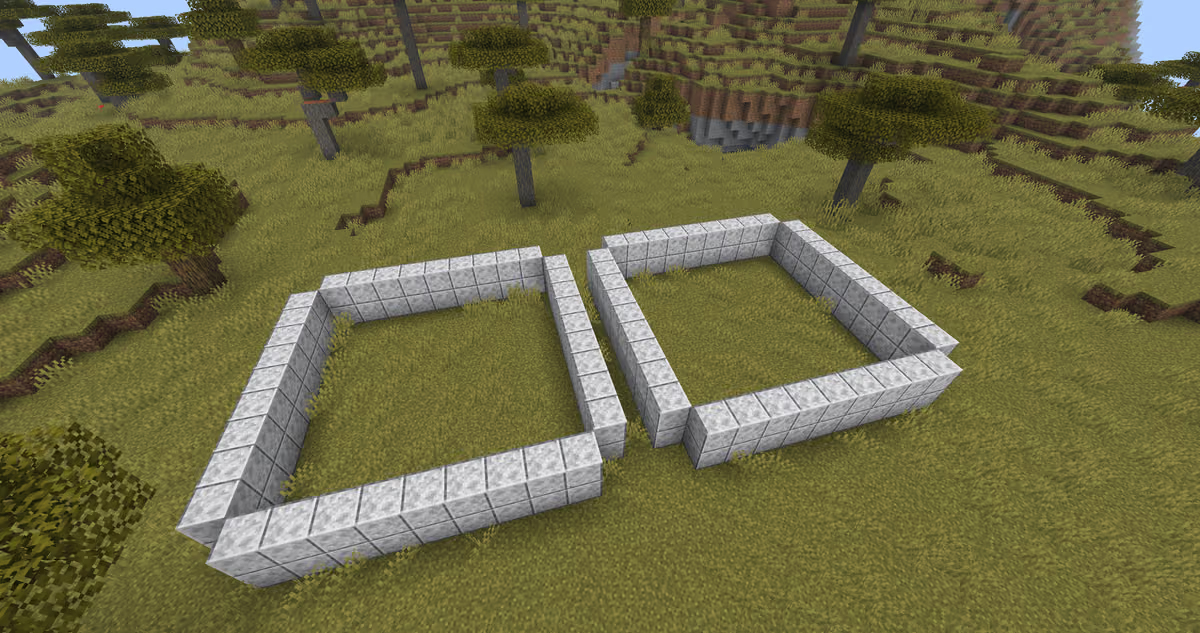
Two 9×9 outlines with a one-block gap between them, walls two blocks high
Step 2. Water, farmland and planting
In the center of each outline, break a block, place a bottom Slab and pour in a Water Bucket. A single source in the center moisturizes the entire area, because farmland remains moist within a 4-block radius of water, and in a 9×9 field it is exactly 4 blocks from the center to the edge. Next to the water, at field level, place a Composter — this is the farmer's workstation — and cover it with a Glowstone on top for lighting.
Use a hoe to till all the dirt around the center until it turns into farmland. The central block with water remains unplanted, and plant the remaining 80 blocks with Wheat Seeds. Repeat these exact same steps for the second outline.
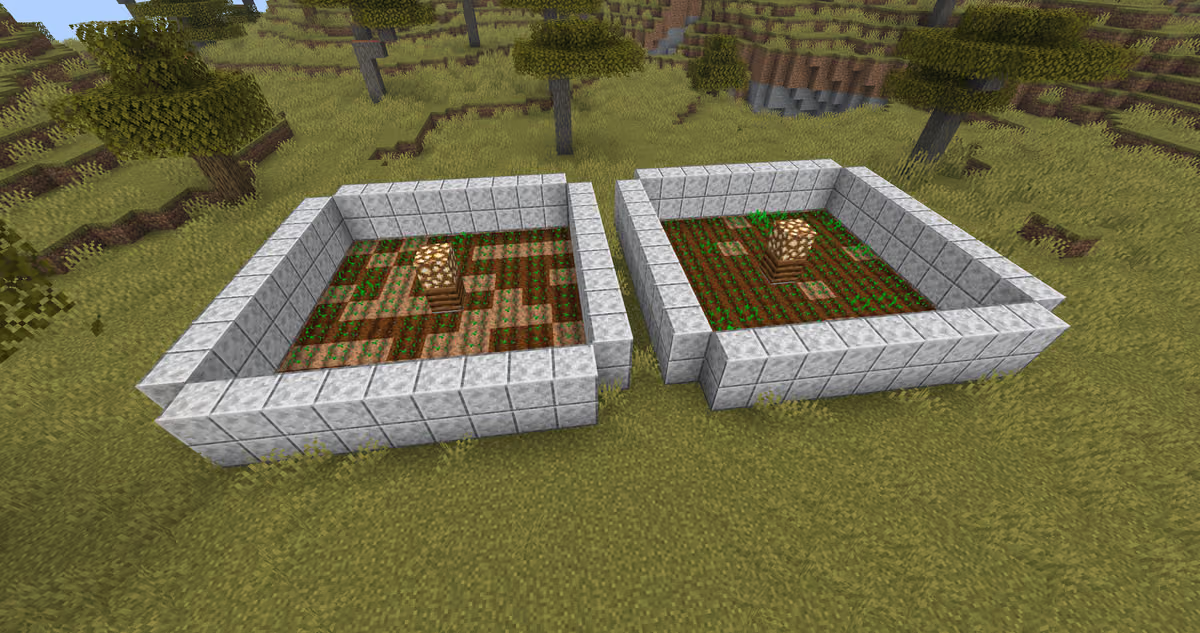
Center of the field — a bottom Slab with water, next to it a Composter with a Glowstone on top, surrounded by farmland planted with wheat
Step 3. Collection mechanism
Go into the gap between the outlines and break 4 blocks so that both slots connect. Near the break, dig out 2 dirt blocks and place a Chest there. Connect the Chest with Hoppers to both field centers — this is exactly where the bread will flow.
On the central block of each field, place a Rail and put two Minecarts with Hoppers on top of each other. The layout on each side should be: Hopper — Minecart with Hopper — Minecart with Hopper. Cover the mechanism with a Trapdoor on top from both sides so that the villager doesn't fall inside.
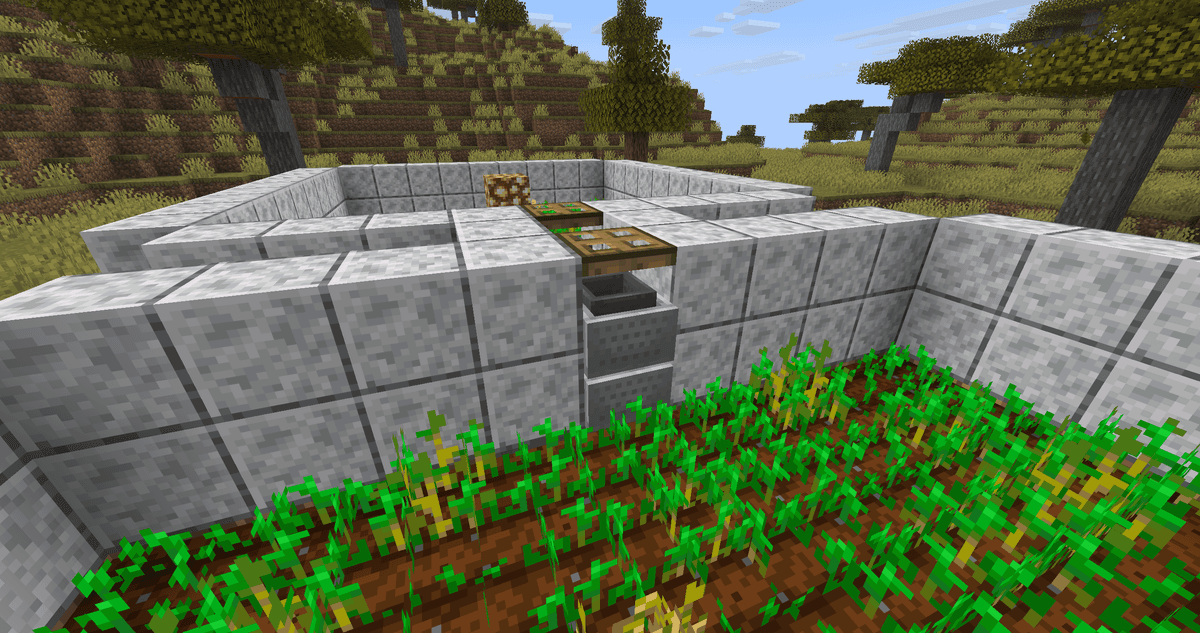
Resource collection mechanism
Step 4. Space for the fletcher
Between the two collection mechanisms, dig out one block and place a Fletching Table there. Enclose this niche on the sides with blocks and bottom Slabs, leaving the villager just enough room to stand on the table. The fletcher must be in the center, equidistant from both fields, so that the farmers can reach them with a throw from either side.
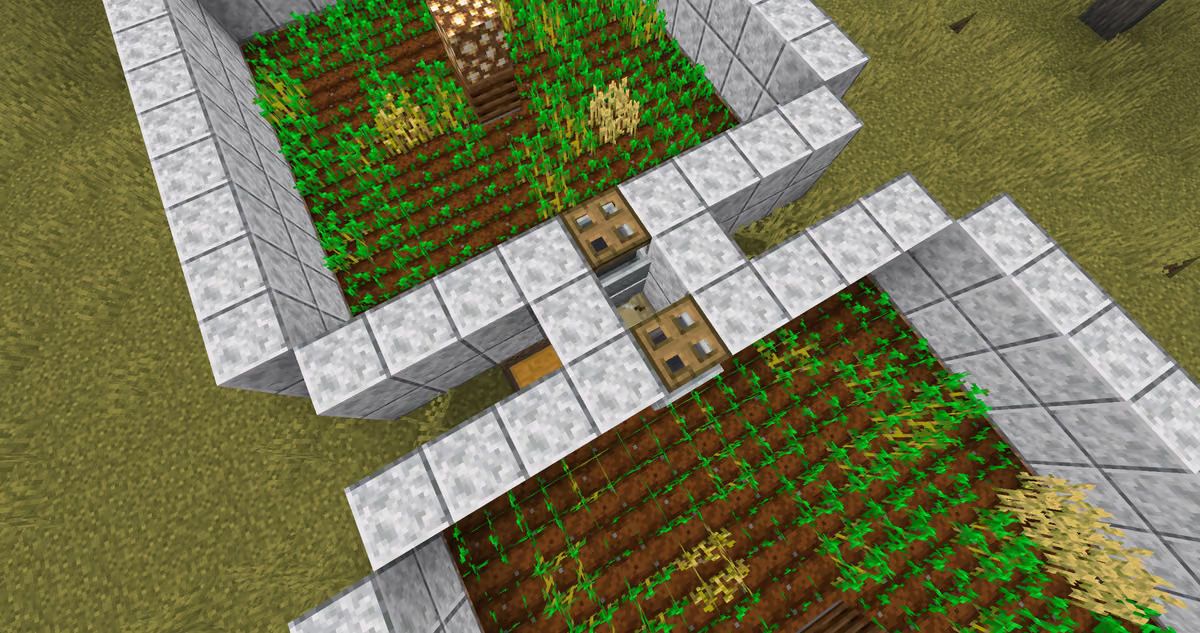
Opening for the fletcher
Step 5. Populating the villagers
Transport three villagers to the farm using a boat. Place two in the different fields — near the Composters they will become farmers. Place the third one in the central niche on the Fletching Table. Verify that each farmer has obtained a straw hat, and the central villager — a fletcher's outfit.
The farm does not start instantly. First, the farmers plant the fields and wait for the wheat to mature. Once the crop is mature and there is enough grain in the farmer's inventory, they will start crafting bread and throwing it to the fletcher — and the Minecarts with Hoppers will intercept everything into the Chest.
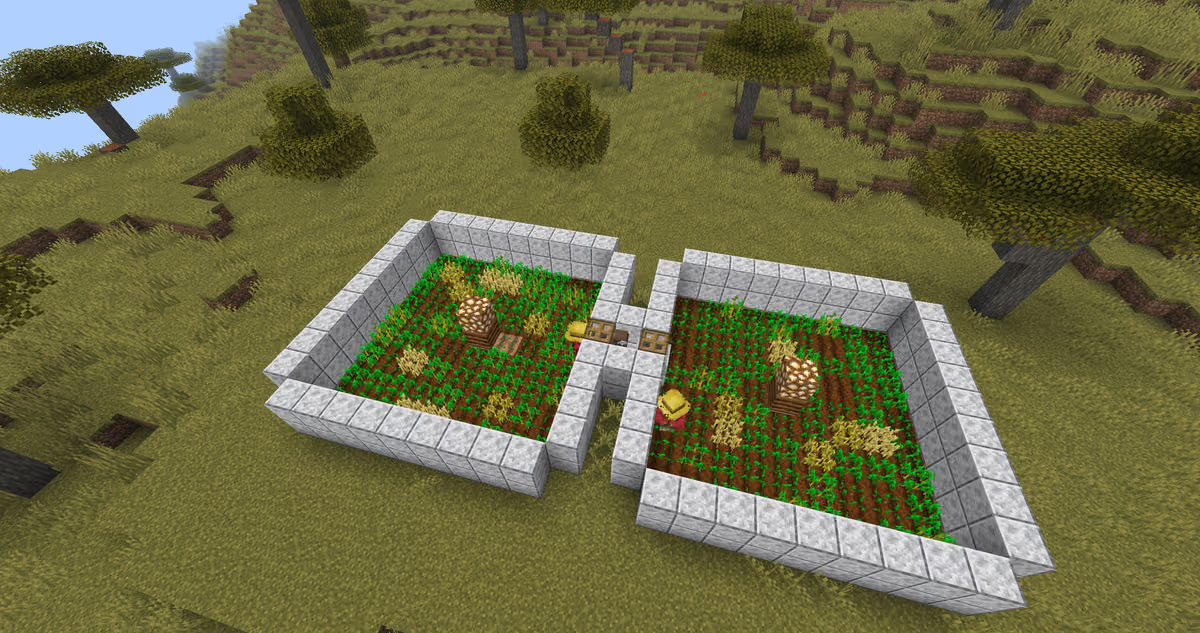
A fully completed farm for automatic crop collection
Common mistakes and how to avoid them
Most problems come down to a few common miscalculations:
The villager didn't become a farmer. The Composter is occupied by another villager or is unreachable. Give each farmer their own Composter and ensure the path to it is clear.
The central villager is also farming. If there is an available Composter near the fletcher, they might become a farmer and stop being "hungry". There should only be a Fletching Table in the center.
The farm stands without bread. The fletcher is full or the throw doesn't reach them. Make sure the central villager does not receive food past the Minecarts with Hoppers and stands within throwing range of both farmers.
The farmer wastes seeds in the Composter. The villager goes to the Composter and turns seeds into bone meal, leaving them without planting material. Block access to the top of the Composter with Trapdoors.
Wheat isn't growing. Lack of light or water. The Glowstone should illuminate the field, and the central water source should keep the farmland moist.
Villagers escape the field. The outline is lower than 2 blocks. Raise the walls.
Farmers only work during the daytime phase. Without beds, they don't sleep at night but just stand in place, so the farm yields its main crop during the day. The Glowstone prevents the wheat from stopping its growth at night.
As long as the chunk with the farm is not loaded, the villagers do nothing. Keep the farm within simulation distance — near your base or under a chunk loader system.
Conclusion
A villager wheat farm provides a constant supply of bread without any manual labor: you don't harvest the crops or replant the seeds, the farmers do it. It is suitable for mid-game survival as a stable source of food and material for trading emeralds with those same farmers. If you need raw grain or a one-time harvest, it is easier to make a regular manual field.
Leave a comment
Links will be stripped
No comments yet. Be the first to share your thoughts.